Building Long-Running MCP Tools with Human-in-the-Loop
In the previous tutorial, you built a weather MCP server that demonstrated how Temporal makes tools durable and fault-tolerant. But what about operations that need to wait for human input? What if your AI tool needs to pause and wait for approval before proceeding?
Real-world AI applications need human interaction for feedback, approvals, and clarifications. Consider an invoice processing system—you might want an AI agent to prepare invoices automatically, but you still want human approval before actually charging a customer. Or imagine a content moderation system that flags questionable content for human review before taking action.
Temporal makes human-in-the-loop patterns reliable by preserving workflow state during long waiting periods—whether that's minutes, hours, or days. If users close their browser, restart their application, or the system crashes while waiting for approval, Temporal automatically resumes exactly where it left off without losing any progress or requiring retry logic.
In this tutorial, you'll build an invoice processing MCP tool that demonstrates human-in-the-loop patterns. The tool will process invoices automatically but pause to wait for human approval before finalizing payments—and it will use Temporal's durable timers to handle approval deadlines.
Prerequisites
Before you begin, you'll need:
- Claude Desktop
- A basic understanding of MCP
- Check out this section of the tutorial if you'll like to learn more or
- Check out our first MCP tutorial which builds a request-response MCP server without human-in-the-loop capabilities.
What You'll Learn
By the end of this tutorial, you'll understand:
- How to use Temporal's durable timers for long-running operations
- How to implement Signals to send data to running workflows
- How to implement Queries to safely read workflow state
If you're new to MCP, here are some key concepts:
What is Model Context Protocol (MCP)?
Model Context Protocol (MCP) is a protocol that allows LLMs to direct AI applications to invoke external functions.
Three Main Benefits:
a) Custom integrations - Connect your applications to external services like Slack, Google Calendar, databases, and other systems
b) Portable toolset - Build your toolset once using the MCP standard and use it everywhere. For example, create custom coding tools (boilerplate generators, prompt templates, documentation automation) that work across any MCP-compatible IDE or application (e.g., VSCode, Windsurf).
c) Open-source MCP servers - Leverage other open-source MCP servers. If you make an MCP Client, it will allow your application to connect to other MCP servers developed by third parties.
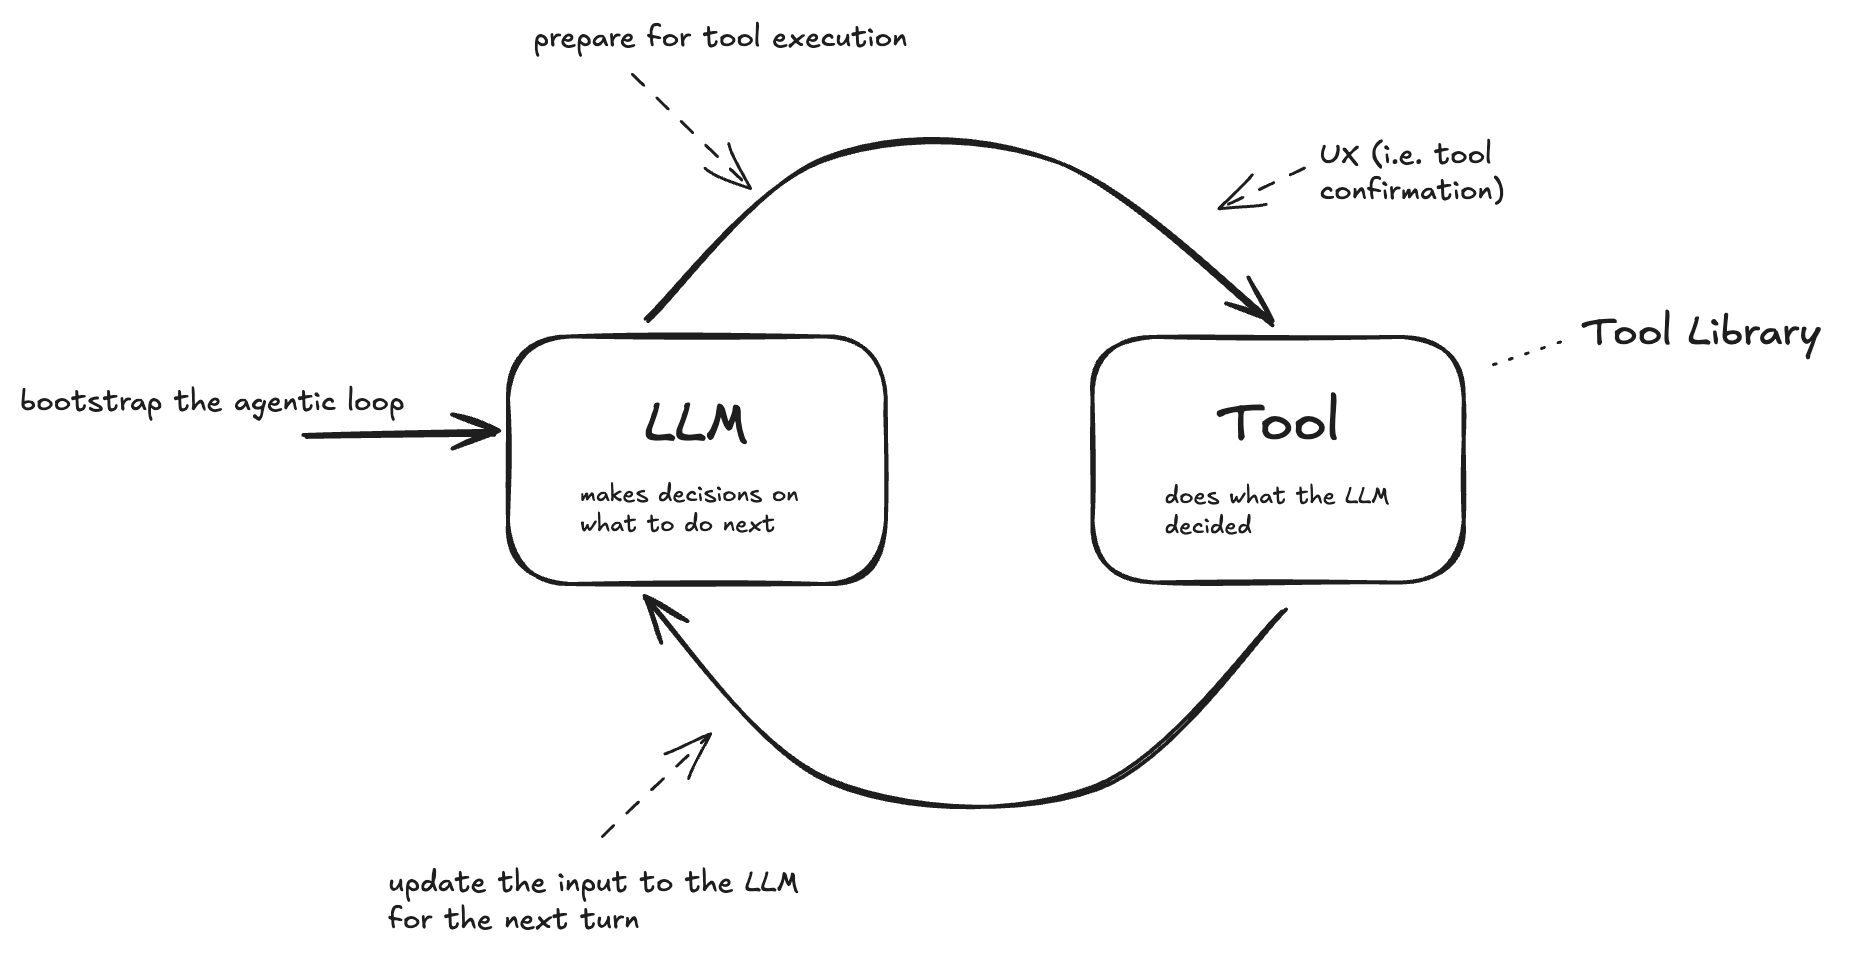
With MCP, tools can present their capabilities to an agentic system dynamically.

Image credit: MCP Explained
Instructions, Tools, and Their Limitations
From basic AI agent design, we know there are two key concepts:
1. Instructions
Instructions define how an agent should behave and make decisions. They're written in human language to guide the agent's actions.
Example:
instructions = "You are a helpful weather assistant. Provide clear, concise weather information."
2. Tools
Tools are how things actually get done. They can be local processes ("read this local file") or remote calls ("query this database").
Sample tool definition:
tools = [
    {
        "type": "function",
        "name": "get_weather_alerts",
        "description": "Get current weather alerts for a US state",
        "parameters": {...}
    }
]
You define problems in simple, human-readable terms, and the AI works with you using the available tools.
The Limitations
However, there are some significant limitations with traditional approaches:
1. Pre-definition Constraint
The system is constrained by its pre-defined tools. What if you want to use tools without pre-defining them in your application?
For example:
- A user wants to check the weather
- The response: "Sorry, I don't have weather capabilities built in yet"
- But weather APIs exist and are accessible!
2. Integration Complexity
- Each integration has its own description and format
- You need to maintain different versions of different integrations
- Adding a new tool means code changes, testing, and redeployment
We want to build agents that can be extended beyond their initial configuration - agents that can discover and use new tools dynamically. Think of Claude Desktop: it can connect to various tools without being rebuilt for each one.
MCP Primitives: Prompts, Resources, and Tools
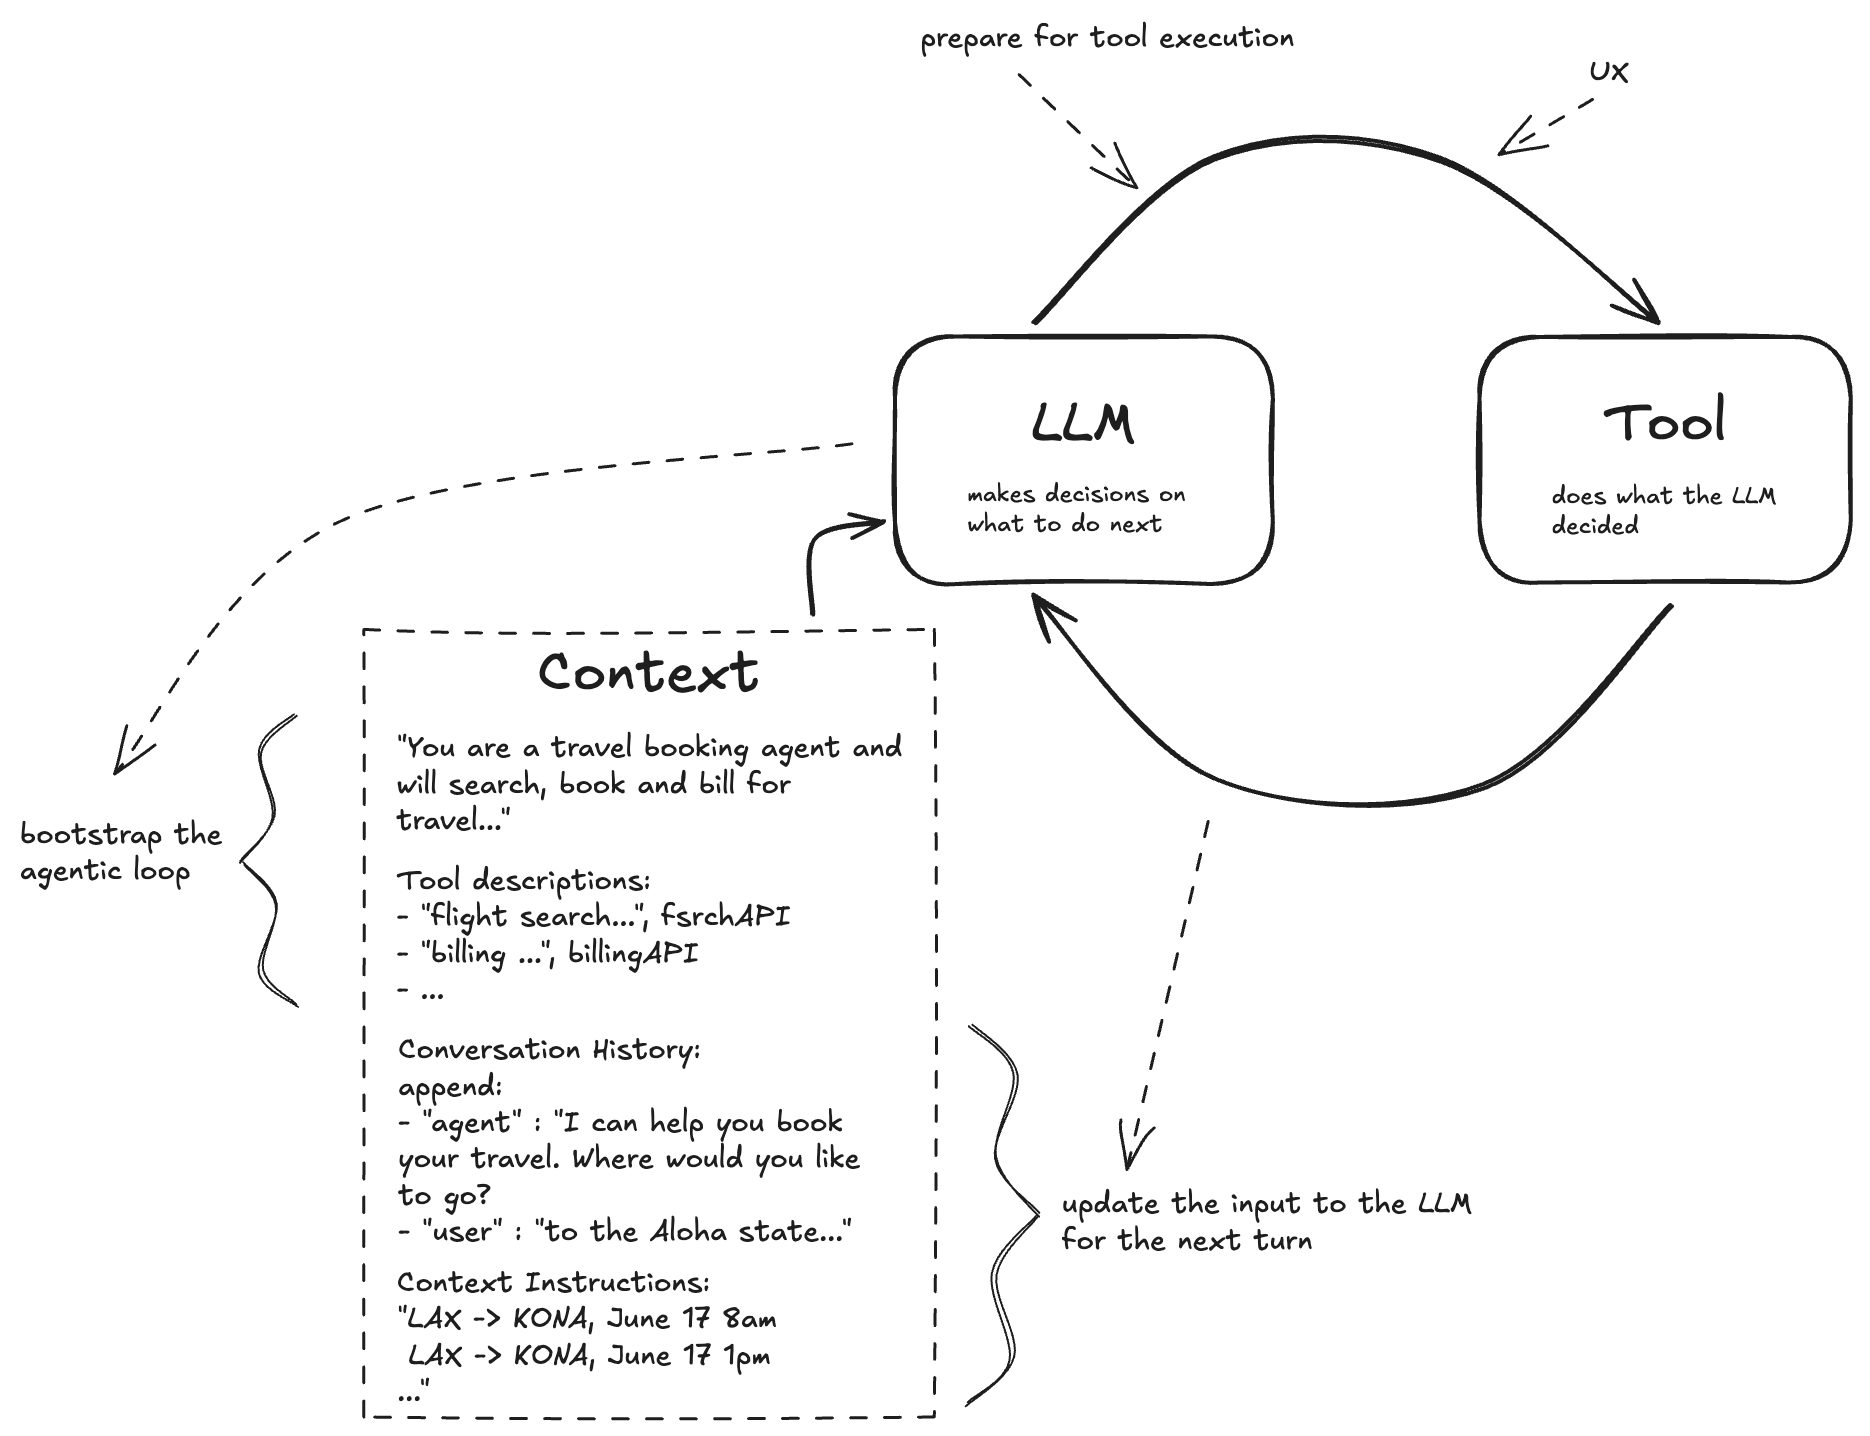
MCP primitives are the things you interact with through MCP:
- Prompts - Templates and instructions
- Resources - Static data like files, databases, and external APIs
- Tools - Agent-ready APIs that perform actions
How Primitives Work Together
Think of MCP like giving an AI assistant a complete workspace instead of just a chat window.
- Prompts = "Here's what I want" - Your instructions and requests
- Resources = "Here's what you need to know" - Background data: your codebase, database records, documentation
- Tools = "Here's what you can do" - Actions the LLM can take: API calls, function execution, file operations
User prompt + injected resources + available tools = LLM decision-making
For example, a coding agent gets context not just from your prompt, but also from your codebase files (resources accessed through MCP), enabling it to understand your specific project before suggesting changes or using development tools.
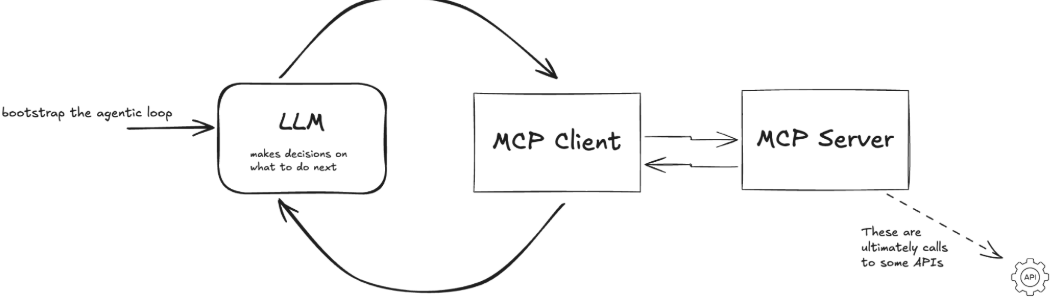
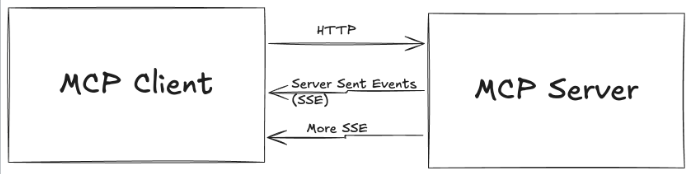
How MCP Client-Server Architecture Works
MCP establishes a client-server communication model where the client and server exchange messages. The protocol defines how clients communicate with the server.
- MCP Clients - Embedded in AI applications
- MCP Servers - Provide tools and resources
- Transport Protocol - Communication layer between them
MCP Server
A system that data owners create to make their systems accessible to AI applications. It:
- Operates independently from the AI application
- Listens for requests from MCP Clients and responds accordingly
- Provides tools, resources, and capabilities
- Communicates to the Client what capabilities are available
Three Key Services:
- Prompt templates - Pre-built prompts for common tasks (e.g., a resume rewriting template)
- Resources - Static data access including files, databases, and external APIs (essentially GET requests)
- Tools - Functions and APIs that allow MCP clients to perform actions
Real-world Example:
A software development team builds an MCP server that connects to their:
- GitHub repositories (for code analysis and pull request management)
- Jira ticketing system (for project tracking and issue creation)
- CI/CD pipeline (for deployment status and build triggers)
- Documentation (for searching and updating technical docs)
Now any MCP-compatible application - whether it's Claude, VSCode, or a custom internal tool - can instantly access all these systems through a single, standardized interface.
MCP Client
AI applications that can connect to MCP Servers to access external data and tools.
When you use Claude Desktop, you'll see various tools and integrations available - this is because Claude Desktop has a built-in MCP Client.
MCP Clients:
- Discover server capabilities (ask servers what tools and resources they have)
- Handle data exchange (receive data from servers and pass it to the AI application)
- Manage tool execution (coordinate when and how the AI uses different tools)
MCP Clients are Embedded in the Agent
The MCP Client is a component inside your AI application, not a separate service.
How It Works:
- User Interaction - User sends a prompt to the agent
- Agent Processing - The LLM processes the request and determines what tools are needed
- MCP Client Role - The embedded MCP Client discovers available tools from connected MCP Servers, sends requests to the appropriate MCP Server(s), and receives responses and passes them back to the LLM
- Agent Response - LLM uses the tool results to generate a final response
The Growing MCP Ecosystem:
Major AI applications and tools are embedding MCP Clients, including:
- Claude Desktop - Anthropic's desktop AI assistant
- IDEs - Cursor, Windsurf, Zed, and other AI-powered code editors
- Custom Applications - Any app can integrate MCP
When you build one MCP Server, it instantly works with all of these applications. You don't need to:
- Write custom integrations for each platform
- Learn different APIs for Claude vs. Cursor vs. Windsurf
- Maintain separate codebases for different tools
- Redeploy when new MCP-compatible applications launch
Transport Protocols
MCP supports multiple transport protocols, allowing you to choose the best communication method for your use case.
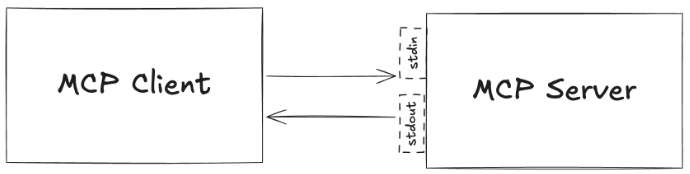
Transport: stdio
Standard input/output (stdio) runs the MCP server as a local subprocess. Ideal for:
- Local development
- Desktop applications like Claude Desktop
Transport: streamable-http
Streamable HTTP uses Server-Sent Events (SSE) over HTTP, allowing the MCP server to run as a remote web service. Ideal for:
- Cloud deployments
- Microservices architectures
- Scenarios where multiple clients need to access the same MCP server from different machines
Why Temporal for MCP?
MCP enables powerful tool integrations, but the protocol itself doesn't provide durability. MCP servers need to orchestrate complex, multi-step operations that interact with external systems. Temporal is a great choice for this use case.
With Temporal:
- Your MCP tool can run for hours, days, or even months
- The tool keeps running even if the MCP server process crashes or restarts
- State is preserved across failures automatically
- When an external API is temporarily down, Temporal retries automatically
Building the Invoice Processing System
In this tutorial, you will build a complete invoice processing system that demonstrates human-in-the-loop patterns. The system will:
- Accept invoice data from an MCP tool
- Process payment line items automatically
- Wait for human approval (with a timeout)
- Allow humans to query the current status
- Handle both approval and rejection signals
Project Setup
First, create a new directory for this project:
mkdir invoice-mcp-tutorial
cd invoice-mcp-tutorial
Initialize a new Python project with uv:
uv init
Add the required dependencies:
uv add temporalio fastmcp
Step 1: Define External Interactions as Activities
You will now define the functions that handle interactions with external systems. These functions are called Activities.
Activities in Temporal encapsulate code that interacts with external systems—like payment gateways, databases, or third-party APIs. The key benefit is built-in fault tolerance: if an Activity fails due to a network issue or temporary service outage, Temporal automatically retries it with configurable backoff strategies. You simply write the business logic (like calling a payment API), and Temporal handles retries, timeouts, and error tracking.
For this invoice system, we need to process payments for each line item. Payment processing is inherently unreliable—payment gateways can be temporarily unavailable, networks can fail, or rate limits might be hit. Making this an Activity ensures these operations are automatically retried until they succeed.
Create a file called activities.py that defines the payment processing logic:
from temporalio import activity

@activity.defn
async def process_payment(line_item: dict) -> str:
    """Process a single invoice line item payment.

    Args:
        line_item: Dictionary containing item, amount, and description
    """
    item = line_item.get("item", "Unknown")
    amount = line_item.get("amount", 0.0)

    # In a real system, this would call a payment gateway
    # For this tutorial, we'll simulate processing
    activity.logger.info(f"Processing payment: {item} - ${amount}")

    return f"Processed payment for {item}: ${amount}"
The code extracts the item name and amount from the line item dictionary, logs the payment processing (in production, this is where you'd call Stripe, PayPal, or another payment processor), and returns a confirmation message.
As you can see, this is as straightforward as adding the @activity.defn decorator above your regular Python function. As an Activity, your API call is now:
- Protected against API timeouts
- Automatically retried with backoff
- Observable for debugging
Step 2: Create the Invoice Workflow
Now you'll create a Workflow that orchestrates your Activity (processing payments) to handle invoice line items. Create a file called workflow.py to contain your workflow logic.
Understanding Workflow Structure
Workflows in Temporal are defined as asynchronous classes with these key elements:
- Class decorator:
@workflow.defnmarks the class as a Workflow - Entry point method: A single
asyncmethod decorated with@workflow.run - Activity execution: Activities are called using
workflow.execute_activity()
A Workflow Definition is essentially a function that can store state and orchestrates the execution of Activities. Workflows manage the coordination and logic of your application's processes, while Activities perform the tasks that interact with external services or are prone to failure.
Let's build the Workflow step by step:
Step 1: Set Up Your Workflow File
Create workflow.py and start with the necessary imports:
from temporalio import workflow
from datetime import timedelta
Step 2: Import Activity inside the Workflow
Before you can use your Activities, you need to import them inside your Workflow. Temporal requires a special import pattern:
# Import Activities using Temporal's safe import pattern
with workflow.unsafe.imports_passed_through():
    from activities import process_payment
Why workflow.unsafe.imports_passed_through()? Temporal relies on a Replay mechanism to recover from failure. As your program progresses, Temporal saves the input and output from function calls to the history. This allows a failed program to restart right where it left off.
Temporal requires this special import pattern for Workflows for replay. This import pattern tells Temporal: "These imports are safe to use during replay."
Step 3: Define the Workflow Class
Create your Workflow class with the required decorators:
@workflow.defn
class InvoiceWorkflow:
    @workflow.run
    async def run(self, invoice: dict) -> str:
        """Process an invoice.

        Args:
            invoice: Dictionary containing invoice lines and metadata
        """
        # Your orchestration logic will go here
Step 4: Execute Activities for Each Line Item
Inside the run method, process each invoice line item by calling your process_payment Activity. Notice how we:
- Use
await workflow.execute_activity()to execute theprocess_paymentActivity - Set a Start-to-Close timeout of 30 seconds, which is the maximum amount of time a single Activity Execution can take before retrying
@workflow.defn
class InvoiceWorkflow:
    @workflow.run
    async def run(self, invoice: dict) -> str:
        """Process an invoice.

        Args:
            invoice: Dictionary containing invoice lines and metadata
        """
        results = []

        for line in invoice.get("lines", []):
            result = await workflow.execute_activity(
                process_payment,
                line,
                start_to_close_timeout=timedelta(seconds=30),
            )
            results.append(result)

        return f"Invoice processed:\n" + "\n".join(results)
Key points about workflow.execute_activity():
- First parameter: The Activity function to execute (referenced by name)
- Second parameter: The input to pass into the Activity
- Third parameter: The Activity timeout you wish to set
Your workflow.py should look like this:
from temporalio import workflow
from datetime import timedelta

# Import Activities using Temporal's safe import pattern
with workflow.unsafe.imports_passed_through():
    from activities import process_payment

@workflow.defn
class InvoiceWorkflow:
    @workflow.run
    async def run(self, invoice: dict) -> str:
        """Process an invoice.

        Args:
            invoice: Dictionary containing invoice lines and metadata
        """
        results = []

        for line in invoice.get("lines", []):
            result = await workflow.execute_activity(
                process_payment,
                line,
                start_to_close_timeout=timedelta(seconds=30),
            )
            results.append(result)

        return f"Invoice processed:\n" + "\n".join(results)
So far, you've created a payment processing Activity and an Invoice Workflow that automatically processes all invoice line items. This Workflow is now durable.
More on Durable Execution
Durable Execution ensures that your application behaves correctly despite adverse conditions by guaranteeing that it will run to completion.
In your invoice processing workflow:
- If a payment API call fails after processing 3 out of 5 line items, you don't lose the work already completed—only the failed payment is retried.
- If the payment gateway times out on one transaction, you can retry just that payment without reprocessing the ones that already succeeded.
- If your process crashes mid-execution, it can resume from the last successful payment without double-charging customers.
- Long-running approval workflows can wait for hours or days for human input without losing context or consuming resources.
Without durability, every failure means starting over—risking duplicate charges or lost progress. With durability, failures become recoverable interruptions instead of catastrophic losses.
Why Invoice Processing Needs Durability
Your invoice workflow needs to:
- Accept invoice data from the MCP tool
- Possible problems: validation failures, malformed data
- Process payments for each line item
- Possible problems: payment gateway timeout, API rate limits, network failures
- Wait for human approval (potentially days)
- Possible problems: user browser crashes, connection drops, Worker restarts
- Return completion status
- Possible problem: connection dropped before final response
This is why durability matters. Without it, invoice workflows become fragile—risking duplicate charges, lost payments, or requiring users to restart lengthy approval processes. With durability, failures become manageable interruptions instead of catastrophic losses.
Now you'll add human-in-the-loop capabilities so the Workflow waits for approval before processing payments.
Step 3: Adding Signals for Human Approval
Now let's add human-in-the-loop capabilities to your Workflow using Signals.
Understanding the Human-in-the-Loop Pattern
The human-in-the-loop pattern enables applications to pause execution and wait for user input before proceeding. This is essential for scenarios where:
- Human judgment is required - Decisions that need expertise, context, or ethical considerations (like approving large invoices)
- Verification is needed - Confirming that automated work meets expectations before proceeding
- Interactive refinement - Allowing users to review, edit, and iterate on AI-generated or automated content
What are Signals?
Signals allow external systems to send data to running workflows, enabling human interaction during Workflow Execution. Think of them as named methods that can be called from outside the Workflow while it's running. They allow you to:
- Modify workflow state - Update variables that control Workflow logic
- Trigger conditional logic - Change the execution path based on the Signal data
- Unblock waiting conditions - Resume a paused Workflow that's waiting for input
Signals are asynchronous—when you send a Signal, it gets queued and processed by the Workflow, but the sender doesn't wait for the Workflow to handle it.
In our invoice system, we'll use Signals to handle approval and rejection decisions from humans. When a human clicks "approve" or "reject" in the interface, that action sends a Signal to the running workflow.
Adding Workflow State
First, add an __init__ method to track approval state:
@workflow.defn
class InvoiceWorkflow:
    def __init__(self) -> None:
        # Track approval state
        self.approved: bool | None = None
        self.status: str = "Processing"
This state is automatically persisted by Temporal and survives crashes. If your process crashes while waiting for approval, when it restarts, the Workflow will resume with the exact same state—it remembers whether it was approved, rejected, or still waiting.
Defining Signal Methods
Add two signal methods to your workflow class - to approve and reject the invoice:
    @workflow.signal
    async def approve_invoice(self) -> None:
        """Signal to approve the invoice."""
        workflow.logger.info("Invoice approved via signal")
        self.approved = True

    @workflow.signal
    async def reject_invoice(self) -> None:
        """Signal to reject the invoice."""
        workflow.logger.info("Invoice rejected via signal")
        self.approved = False
The @workflow.signal decorator marks these methods as signal handlers. When someone approves or rejects an invoice, they send the appropriate signal that updates the self.approved field.
Using Wait Conditions to Pause Execution
We've now stored our initial Signal state and defined what happens when it comes in. Next, we need a way for the Workflow to pause and wait for that Signal to arrive. This is where workflow.wait_condition() comes in.
- Use
workflow.wait_condition()to pause until Signal is received (user decides the next step) - Creates a blocking checkpoint where the Workflow stops and waits
- Resumes execution only when specified condition becomes true
- Optionally accepts a timeout parameter: workflow.wait_condition(lambda: condition, timeout=timedelta(hours=24)) - waits until Signal received OR timeout elapsed, whichever happens first
Update your run method to wait for approval before processing payments. The workflow.wait_condition() method creates a blocking checkpoint where the workflow stops and waits for a specific condition to become true.
    @workflow.run
    async def run(self, invoice: dict) -> str:
        """Process an invoice with human approval.

        Args:
            invoice: Dictionary containing invoice lines and metadata
        """
        # Step 1: Wait for approval (with a 5-day timeout)
        await workflow.wait_condition(
            lambda: self.approved is not None,
            timeout=timedelta(days=5),
        )

        # Step 2: Auto-reject if no approval happened after 5 days
        if self.approved is None:
            self.approved = False
            return "REJECTED"

        # Step 3: Only process payments if approved
        for line in invoice.get("lines", []):
            await workflow.execute_activity(
                process_payment,
                line,
                start_to_close_timeout=timedelta(seconds=30),
            )

        self.status = "Completed"
        return "COMPLETED"
This line pauses the workflow until either:
- The condition becomes true - A signal changes
self.approvedfromNonetoTrueorFalse - The timeout expires - After 5 days, control returns to the workflow (but
self.approvedis stillNone)
This pattern ensures that payment processing only happens after explicit human approval, preventing accidental charges.
Your workflow.py should look like this:
from temporalio import workflow
from datetime import timedelta

# Import Activities using Temporal's safe import pattern
with workflow.unsafe.imports_passed_through():
    from activities import process_payment

@workflow.defn
class InvoiceWorkflow:
    def __init__(self) -> None:
        # Track approval state
        self.approved: bool | None = None
        self.status: str = "Processing"

    @workflow.signal
    async def approve_invoice(self) -> None:
        """Signal to approve the invoice."""
        workflow.logger.info("Invoice approved via signal")
        self.approved = True

    @workflow.signal
    async def reject_invoice(self) -> None:
        """Signal to reject the invoice."""
        workflow.logger.info("Invoice rejected via signal")
        self.approved = False

    @workflow.run
    async def run(self, invoice: dict) -> str:
        """Process an invoice with human approval.

        Args:
            invoice: Dictionary containing invoice lines and metadata
        """

        await workflow.wait_condition(
            lambda: self.approved is not None,
            timeout=timedelta(days=5),
        )

        # Auto-reject if no approval happened after 5 days
        if self.approved is None:
            self.approved = False
            return "REJECTED"

        # Only process payments if approved
        self.status = "Processing payments"

        for line in invoice.get("lines", []):
            await workflow.execute_activity(
                process_payment,
                line,
                start_to_close_timeout=timedelta(seconds=30),
            )

        self.status = "Completed"
        return "COMPLETED"
Step 4: Adding Queries to Check Status
Queries let you safely read workflow state without modifying it. They're synchronous operations that return immediately, making them perfect for status checks and monitoring.
What are Queries?
Queries are read-only methods on your Workflow class that external systems can call to inspect the workflow's current state. They can be used for:
- Checking current status
- Retrieving partial results
- Building dashboards and monitoring tools
- Providing real-time feedback to users
Tracking Status in Your Workflow
Before we can query the workflow status, we need to track it throughout the workflow's execution. Update your workflow's run method to set self.status at key points:
    @workflow.run
    async def run(self, invoice: dict) -> str:
        """Process an invoice with human approval.

        Args:
            invoice: Dictionary containing invoice lines and metadata
        """
        # Step 1: Wait for approval (with a 5-day timeout)
        self.status = "Awaiting approval"  # Update status before waiting

        await workflow.wait_condition(
            lambda: self.approved is not None,
            timeout=timedelta(days=5),
        )

        # Step 2: Auto-reject if no approval happened after 5 days
        if self.approved is None:
            self.approved = False
            self.status = "Approval timeout - invoice rejected"  # Update status on timeout
            return "REJECTED"

        # Step 3: If rejected, update status and return early
        if not self.approved:
            self.status = "Rejected by approver"  # Update status on rejection
            return "REJECTED"

        # Step 4: Only process payments if approved
        self.status = "Processing payments"  # Update status before processing

        for line in invoice.get("lines", []):
            await workflow.execute_activity(
                process_payment,
                line,
                start_to_close_timeout=timedelta(seconds=30),
            )

        self.status = "Completed"  # Update status on completion
        return "COMPLETED"
Notice how self.status is updated at each stage.
These status updates provide visibility into where the workflow is in its lifecycle, which external systems can query at any time.
Defining a Query Method
Now add a query method to your workflow class that returns the current status:
    @workflow.query
    def get_status(self) -> str:
        """Query to get current invoice status."""
        return self.status
The @workflow.query decorator marks this method as a query handler. External systems can call this query at any time to check the invoice status without affecting the workflow's execution. The query simply returns the current value of self.status, which is being updated as the workflow progresses.
Your workflow.py should look like this:
from temporalio import workflow
from datetime import timedelta

# Import Activities using Temporal's safe import pattern
with workflow.unsafe.imports_passed_through():
    from activities import process_payment

@workflow.defn
class InvoiceWorkflow:
    def __init__(self) -> None:
        # Track approval state
        self.approved: bool | None = None
        self.status: str = "Processing"

    @workflow.signal
    async def approve_invoice(self) -> None:
        """Signal to approve the invoice."""
        workflow.logger.info("Invoice approved via signal")
        self.approved = True

    @workflow.signal
    async def reject_invoice(self) -> None:
        """Signal to reject the invoice."""
        workflow.logger.info("Invoice rejected via signal")
        self.approved = False

    @workflow.query
    def get_status(self) -> str:
        """Query to get current invoice status."""
        return self.status

    @workflow.run
    async def run(self, invoice: dict) -> str:
        """Process an invoice with human approval.

        Args:
            invoice: Dictionary containing invoice lines and metadata
        """
        # Step 1: Wait for approval (with a 5-day timeout)
        self.status = "Awaiting approval"

        await workflow.wait_condition(
            lambda: self.approved is not None,
            timeout=timedelta(days=5),
        )

        # Step 2: Auto-reject if no approval happened after 5 days
        if self.approved is None:
            self.approved = False
            self.status = "Approval timeout - invoice rejected"
            return "REJECTED"

        # Step 3: If rejected by human, return early
        if not self.approved:
            self.status = "Rejected by approver"
            return "REJECTED"

        # Step 4: Only process payments if approved
        self.status = "Processing payments"

        for line in invoice.get("lines", []):
            await workflow.execute_activity(
                process_payment,
                line,
                start_to_close_timeout=timedelta(seconds=30),
            )

        self.status = "Completed"
        return "COMPLETED"
Step 5: Understanding Durable Timers
Now that you've built a workflow with signals and queries, let's understand a critical concept that makes the approval waiting period possible: durable timers.
Traditional async timers (asyncio.sleep() in Python) are lost when your process crashes or restarts. If your application is waiting for 5 days and crashes on day 3, you lose all progress.
Temporal's durable timers survive crashes and restarts. When you use workflow.sleep(), and if your process crashes, when it restarts, Temporal replays the Workflow and reinstates the timer exactly where it left off.
Example: A Durable Timer:
from temporalio import workflow
from datetime import timedelta

@workflow.defn
class InvoiceWorkflow:
    @workflow.run
    async def run(self, invoice: dict) -> str:
        # Process invoice line items
        for line in invoice.get("lines", []):
            await workflow.execute_activity(
                process_payment,
                line,
                start_to_close_timeout=timedelta(seconds=30),
            )

        # This timer is durable!
        # If the worker crashes during this sleep, it will resume when restarted
        await workflow.sleep(timedelta(seconds=20))

        return "Invoice processed successfully"
In this example, if your process crashes during the 20-second sleep, when it restarts, Temporal will continue the timer from where it left off. The invoice processing logic won't be re-executed because Temporal knows it already completed.
Adding a Durable Timer to Your Invoice Workflow
Let's add a practical use of durable timers to your invoice workflow. You'll add a 2-second delay between processing each invoice line item to simulate rate limiting or pacing payment processing.
Update your workflow's run method to include a durable sleep before processing each payment.
Your workflow.py should look like this:
from temporalio import workflow
from datetime import timedelta

# Import Activities using Temporal's safe import pattern
with workflow.unsafe.imports_passed_through():
    from activities import process_payment

@workflow.defn
class InvoiceWorkflow:
    def __init__(self) -> None:
        # Track approval state
        self.approved: bool | None = None
        self.status: str = "Processing"

    @workflow.signal
    async def approve_invoice(self) -> None:
        """Signal to approve the invoice."""
        workflow.logger.info("Invoice approved via signal")
        self.approved = True

    @workflow.signal
    async def reject_invoice(self) -> None:
        """Signal to reject the invoice."""
        workflow.logger.info("Invoice rejected via signal")
        self.approved = False

    @workflow.query
    def get_status(self) -> str:
        """Query to get current invoice status."""
        return self.status

    @workflow.run
    async def run(self, invoice: dict) -> str:
        """Process an invoice with human approval.

        Args:
            invoice: Dictionary containing invoice lines and metadata
        """
        # Wait for approval (with a 5-day timeout)
        await workflow.wait_condition(
            lambda: self.approved is not None,
            timeout=timedelta(days=5),
        )

        # Auto-reject if no approval happened after 5 days
        if self.approved is None:
            self.approved = False
            return "REJECTED"

        # Only process payments if approved
        self.status = "Processing payments"

        for line in invoice.get("lines", []):
            # Add a durable 2-second delay before processing each payment
            await workflow.sleep(timedelta(seconds=2))

            await workflow.execute_activity(
                process_payment,
                line,
                start_to_close_timeout=timedelta(seconds=30),
            )

        self.status = "Completed"
        return "COMPLETED"
This durable timer ensures that even if your Worker crashes during the delay, when it restarts, it will continue from exactly where it left off—without reprocessing payments that were already completed.
What You've Built So Far
Before wiring everything together with the MCP server, let's recap the workflow components you've created:
1. Payment Processing Activity
You created an Activity (process_payment) that handles external payment gateway interactions with automatic retry capabilities. If payment calls fail, Temporal automatically retries them without losing progress.
2. Invoice Workflow with Human-in-the-Loop
Your InvoiceWorkflow class orchestrates the entire invoice approval process:
- Waits for human approval before processing any payments
- Auto-rejects after timeout if no response within 5 days
- Processes payments only after explicit approval
- Tracks status throughout the lifecycle for visibility
3. Signals for Human Interaction You implemented two signal handlers:
approve_invoice()- Allows humans to approve pending invoicesreject_invoice()- Allows humans to reject pending invoices
These signals can be sent from any external system to control the workflow while it's running.
4. Queries for Status Monitoring
Your get_status() query allows external systems to check the current status of any invoice workflow without modifying its state—perfect for building dashboards or providing real-time feedback to users.
5. Durable Waiting
The workflow uses workflow.wait_condition() with a timeout, which survives crashes and consumes no resources while waiting. This is powered by Temporal's durable timers.
Next, you'll create an MCP server that exposes these Workflow capabilities as tools that Claude Desktop (or any MCP Client) can use to start Workflows, send Signals, and Query status.
Step 6: Create the MCP Server with Multiple Tools
Now you'll create an MCP server that exposes your invoice processing capabilities as tools that Claude Desktop (or any MCP client) can use. The MCP server acts as a Temporal Client, providing the interface between AI applications and your durable workflows.
Understanding the Temporal Client
A Temporal Client provides a set of APIs to communicate with a Temporal Service. In this application, your MCP server uses a Temporal Client to perform several key operations:
- Start Workflow Executions - Begin processing new invoices
- Send Signals to Running Workflows - Approve or reject invoices that are waiting for human input
- Query Workflow State - Check the current status of any invoice without modifying it
- Get Workflow Results - Retrieve the final outcome when processing completes
The client connects to your Temporal Service (running on localhost:7233) and coordinates all interactions with your Workflows. Each MCP tool you create will use the client in different ways.
Creating the MCP Server File
Create a new file called invoice_server.py and let's build each tool step by step:
Step 1: Set Up Imports and Initialize the Server
from temporalio.client import Client
from fastmcp import FastMCP
from workflow import InvoiceWorkflow

# Initialize FastMCP server with a name
mcp = FastMCP("invoice-processor")
The FastMCP initialization creates an MCP server named "invoice-processor". This name will appear in Claude Desktop when you connect to the server.
Step 2: Create the Tool to Start Invoice Processing
The first tool allows users to start processing a new invoice. This tool uses the Temporal Client to start a workflow execution:
@mcp.tool()
async def process_invoice(invoice_data: dict) -> str:
    """Start processing an invoice with the given data.

    Args:
        invoice_data: Dictionary containing:
            - id: Unique invoice identifier
            - lines: List of line items with item, amount, description

    Returns:
        Workflow ID for tracking
    """
    # Step 1: Connect to the Temporal Service
    client = await Client.connect("localhost:7233")

    # Step 2: Extract the invoice ID
    invoice_id = invoice_data.get("id", "unknown")

    # Step 3: Start the workflow execution
    handle = await client.start_workflow(
        InvoiceWorkflow.run,
        invoice_data,
        id=f"invoice-{invoice_id}",
        task_queue="invoice-task-queue",
    )

    # Step 4: Return the workflow ID for tracking
    return f"Started processing invoice {invoice_id}. Workflow ID: invoice-{invoice_id}"
What happens when this tool is called:
- Client Connection - Connects to the Temporal Service at
localhost:7233 - Workflow Start - Calls
client.start_workflow()to begin a newInvoiceWorkflowexecutionInvoiceWorkflow.run- The workflow to executeinvoice_data- The input data (invoice details)id=f"invoice-{invoice_id}"- A unique identifier for this workflow executiontask_queue="invoice-task-queue"- The queue where Workers will pick up this workflow
- Workflow Handle - Returns a handle that can be used to interact with the running workflow later
- User Feedback - Returns a message with the workflow ID so users can track this invoice
After this tool completes, the workflow is running and waiting for approval—but the MCP tool returns immediately. The workflow continues running independently.
Step 3: Create the Tool to Approve Invoices
The second tool sends an approval signal to a running workflow. This demonstrates how to use the Temporal Client to interact with running workflows:
@mcp.tool()
async def approve_invoice(invoice_id: str) -> str:
    """Approve a pending invoice.

    Args:
        invoice_id: The invoice identifier
    """
    # Step 1: Connect to the Temporal Service
    client = await Client.connect("localhost:7233")

    # Step 2: Get a handle to the existing workflow
    handle = client.get_workflow_handle(f"invoice-{invoice_id}")

    # Step 3: Send the approval signal
    await handle.signal(InvoiceWorkflow.approve_invoice)

    # Step 4: Confirm the signal was sent
    return f"Sent approval signal for invoice {invoice_id}"
When this tool is called, it sends a Signal:
- Calls
handle.signal()to send the approval signal to the workflow- The signal is delivered asynchronously—this method returns immediately
- The workflow receives the signal and updates its state accordingly
- If the workflow is waiting at
workflow.wait_condition(), this signal will unblock it - Returns a message confirming the signal was sent
The workflow immediately processes the signal, sets self.approved = True, and proceeds to process payments.
Step 4: Create the Tool to Reject Invoices
The rejection tool works exactly like the approval tool but sends a different signal:
@mcp.tool()
async def reject_invoice(invoice_id: str) -> str:
    """Reject a pending invoice.

    Args:
        invoice_id: The invoice identifier
    """
    # Step 1: Connect to the Temporal Service
    client = await Client.connect("localhost:7233")

    # Step 2: Get a handle to the existing workflow
    handle = client.get_workflow_handle(f"invoice-{invoice_id}")

    # Step 3: Send the rejection signal
    await handle.signal(InvoiceWorkflow.reject_invoice)

    # Step 4: Confirm the signal was sent
    return f"Sent rejection signal for invoice {invoice_id}"
The flow is identical to the approval tool, but:
- It calls
InvoiceWorkflow.reject_invoiceinstead - The workflow sets
self.approved = False - The workflow skips payment processing and completes with "REJECTED" status
Step 5: Create the Tool to Query Invoice Status
The final tool queries the current state of a workflow without modifying it:
@mcp.tool()
async def get_invoice_status(invoice_id: str) -> str:
    """Get the current status of an invoice.

    Args:
        invoice_id: The invoice identifier
    """
    # Step 1: Connect to the Temporal Service
    client = await Client.connect("localhost:7233")

    # Step 2: Get a handle to the existing workflow
    handle = client.get_workflow_handle(f"invoice-{invoice_id}")

    # Step 3: Query the workflow for its current status
    status = await handle.query(InvoiceWorkflow.get_status)

    # Step 4: Return the status to the user
    return f"Invoice {invoice_id} status: {status}"
This tool calls handle.query() to read the workflow's current state
- Queries are synchronous and read-only—they return immediately with the current value
- They don't modify the workflow or send any signals
- They can be called at any time, even while the workflow is running
- The workflow's
get_status()query method returnsself.status - Returns the current status (like "Awaiting approval" or "Processing payments")
Unlike Signals, Queries return a value immediately and don't change the Workflow's state.
Step 6: Configure the Server Transport
Finally, add the code to run the MCP server when the script is executed:
if __name__ == "__main__":
    # Initialize and run the server using stdio transport
    mcp.run(transport='stdio')
The transport='stdio' configuration runs the MCP server as a subprocess using standard input/output, which is ideal for local integrations with Claude Desktop.
Your complete invoice_server.py should look like this:
from temporalio.client import Client
from fastmcp import FastMCP
from workflow import InvoiceWorkflow

# Initialize FastMCP server
mcp = FastMCP("invoice-processor")

@mcp.tool()
async def process_invoice(invoice_data: dict) -> str:
    """Start processing an invoice with the given data.

    Args:
        invoice_data: Dictionary containing:
            - id: Unique invoice identifier
            - lines: List of line items with item, amount, description

    Returns:
        Workflow ID for tracking
    """
    client = await Client.connect("localhost:7233")

    invoice_id = invoice_data.get("id", "unknown")

    handle = await client.start_workflow(
        InvoiceWorkflow.run,
        invoice_data,
        id=f"invoice-{invoice_id}",
        task_queue="invoice-task-queue",
    )

    return f"Started processing invoice {invoice_id}. Workflow ID: invoice-{invoice_id}"

@mcp.tool()
async def approve_invoice(invoice_id: str) -> str:
    """Approve a pending invoice.

    Args:
        invoice_id: The invoice identifier
    """
    client = await Client.connect("localhost:7233")

    handle = client.get_workflow_handle(f"invoice-{invoice_id}")
    await handle.signal(InvoiceWorkflow.approve_invoice)

    return f"Sent approval signal for invoice {invoice_id}"

@mcp.tool()
async def reject_invoice(invoice_id: str) -> str:
    """Reject a pending invoice.

    Args:
        invoice_id: The invoice identifier
    """
    client = await Client.connect("localhost:7233")

    handle = client.get_workflow_handle(f"invoice-{invoice_id}")
    await handle.signal(InvoiceWorkflow.reject_invoice)

    return f"Sent rejection signal for invoice {invoice_id}"

@mcp.tool()
async def get_invoice_status(invoice_id: str) -> str:
    """Get the current status of an invoice.

    Args:
        invoice_id: The invoice identifier
    """
    client = await Client.connect("localhost:7233")

    handle = client.get_workflow_handle(f"invoice-{invoice_id}")
    status = await handle.query(InvoiceWorkflow.get_status)

    return f"Invoice {invoice_id} status: {status}"

if __name__ == "__main__":
    mcp.run(transport='stdio')
Summary: How the Client Works
Starting Workflows (
client.start_workflow())- Creates a new workflow execution
- Returns immediately with a workflow handle
- The workflow continues running independently
Sending Signals (
handle.signal())- Sends data to a running workflow
- Changes workflow state asynchronously
- Used for human decisions like approval/rejection
Querying State (
handle.query())- Reads workflow state synchronously
- Returns immediately with current values
- Doesn't modify the workflow
Step 7: Create the Worker
When you start a Workflow in Temporal, it generates tasks that are placed into a queue called a Task Queue. Workers continuously poll this queue, pick up available tasks, and execute them. Your Workflow progresses as Workers complete each task. Think of it as the "engine" that powers your Temporal application.
Create a file called worker.py that runs your workflows and activities:
Step 1: Import Dependencies:
import asyncio
from temporalio.client import Client
from temporalio.worker import Worker
from activities import process_payment
from workflow import InvoiceWorkflow
Step 2: Create the Worker Function:
async def main():
    # Connect to Temporal service
    client = await Client.connect("localhost:7233")

    worker = Worker(
        client,
        task_queue="invoice-task-queue",
        workflows=[InvoiceWorkflow],
        activities=[process_payment],
    )

    print("Worker started. Listening for invoice workflows...")
    await worker.run()
Step 3: Add the Entry Point
if __name__ == "__main__":
    asyncio.run(main())
Your complete worker.py should look like this:
import asyncio
from temporalio.client import Client
from temporalio.worker import Worker
from activities import process_payment
from workflow import InvoiceWorkflow

async def main():
    # Connect to Temporal service
    client = await Client.connect("localhost:7233")

    worker = Worker(
        client,
        task_queue="invoice-task-queue",
        workflows=[InvoiceWorkflow],
        activities=[process_payment],
    )

    print("Worker started. Listening for invoice workflows...")
    await worker.run()

if __name__ == "__main__":
    asyncio.run(main())
Step 8: Configure Claude Desktop
Claude Desktop has a built-in MCP Client. Once you've connected your MCP server, Claude Desktop can discover the tools you've made available. To connect Claude Desktop your weather MCP server, let's set up a claude_desktop_config.json file.
Create a claude_desktop_config.json file:
{
    "mcpServers": {
      "invoice-processor": {
        "command": "uv",
        "args": [
          "--directory",
          "/Users/yourname/path/to/invoice-mcp-tutorial",
          "run",
          "invoice_server.py"
        ]
      }
    }
  }
Replace the path with your actual project directory.
Copy this config file to Claude Desktop's configuration directory:
cp claude_desktop_config.json ~/Library/Application\ Support/Claude/claude_desktop_config.json
Or on Windows:
copy claude_desktop_config.json %APPDATA%\Claude\claude_desktop_config.json
- Completely quit and restart Claude Desktop for the changes to take effect.
- On macOS: Right-click the Claude icon in the dock and select "Quit"
- On Windows: Right-click the system tray icon and select "Exit"
Step 9: Run Your Application
You are now ready to run your application! To do so, you need two terminal windows running:
Terminal 1 - Start the Temporal Server
temporal server start-dev
This starts the Temporal service on localhost:8233.
Terminal 2 - Start Your Worker
uv run worker.py
You should see: "Worker started. Listening for invoice workflows..."
Test the Integration
Now let's test the complete invoice workflow with Claude Desktop!
Step 1: Process an Invoice
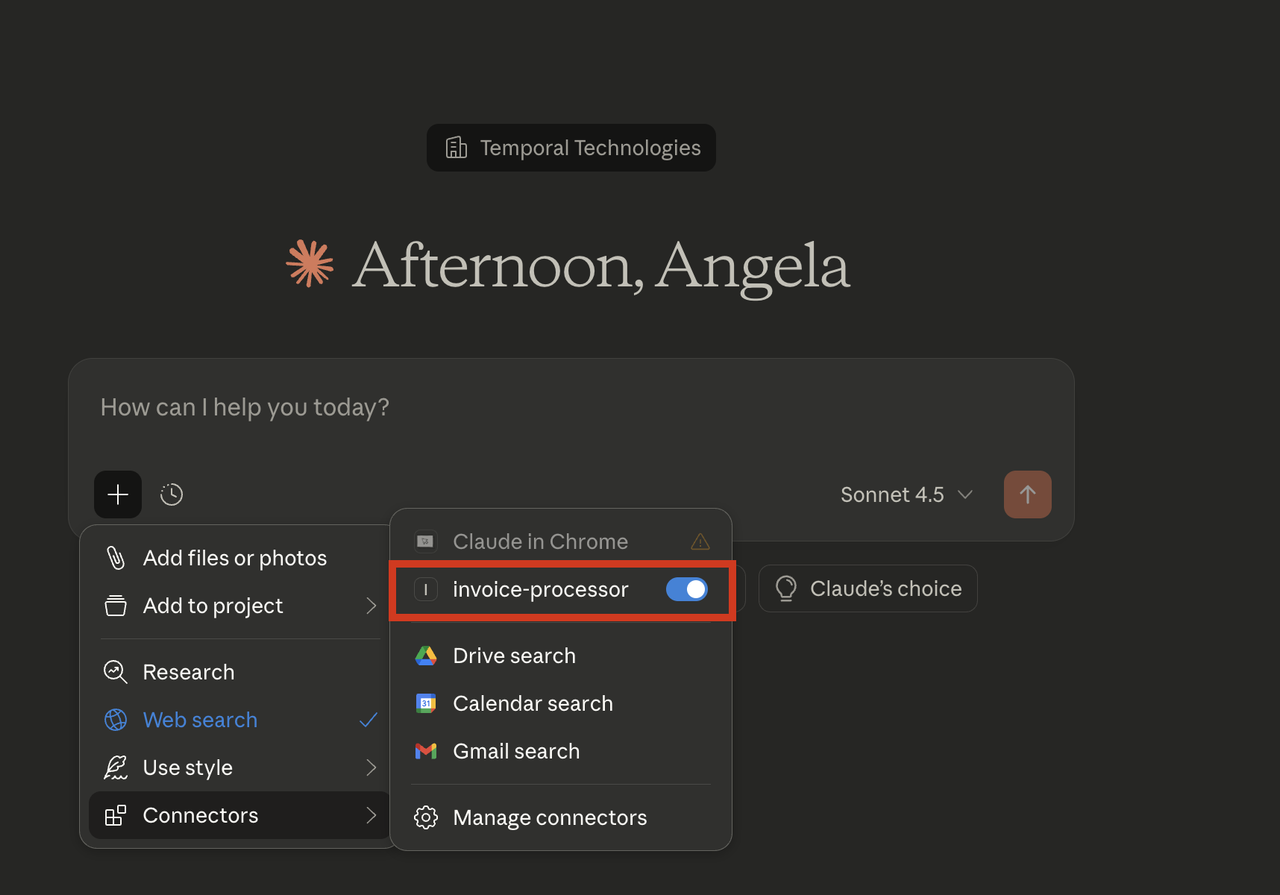
- Open Claude Desktop
- When you open Claude Desktop, click on the icon to the right of the plus sign button. You should now see your configured MCP server (e.g.,
invoice-processor) on your Claude Desktop and the blue toggle should be switched on.
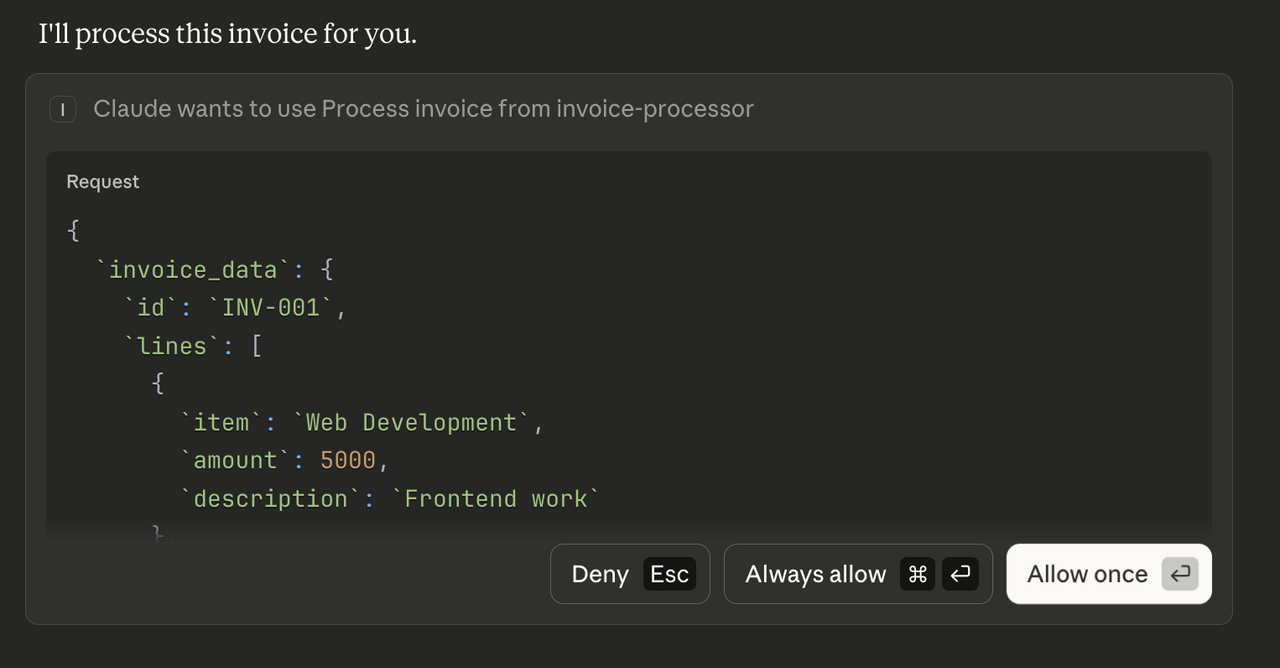
Ask it something like:
Process this invoice:
{
  "id": "INV-001",
  "lines": [
    {"item": "Web Development", "amount": 5000.00, "description": "Frontend work"},
    {"item": "Design Services", "amount": 2000.00, "description": "UI/UX design"}
  ]
}
You'll see that Claude will ask to use the process_invoice tool. Allow it do so:
Claude will then use the process_invoice tool and return a workflow ID. At this point:
- The workflow has processed the payment line items
- It's now waiting for approval
- The workflow will wait for up to 5 days

Step 2: Monitor Your Temporal Web UI
Temporal provides a robust Web UI for managing Workflow Executions. With this Web UI, you can:
- Gain insights like responses from Activities, execution time, and failures
- Debug and understand what's happening during your Workflow Executions
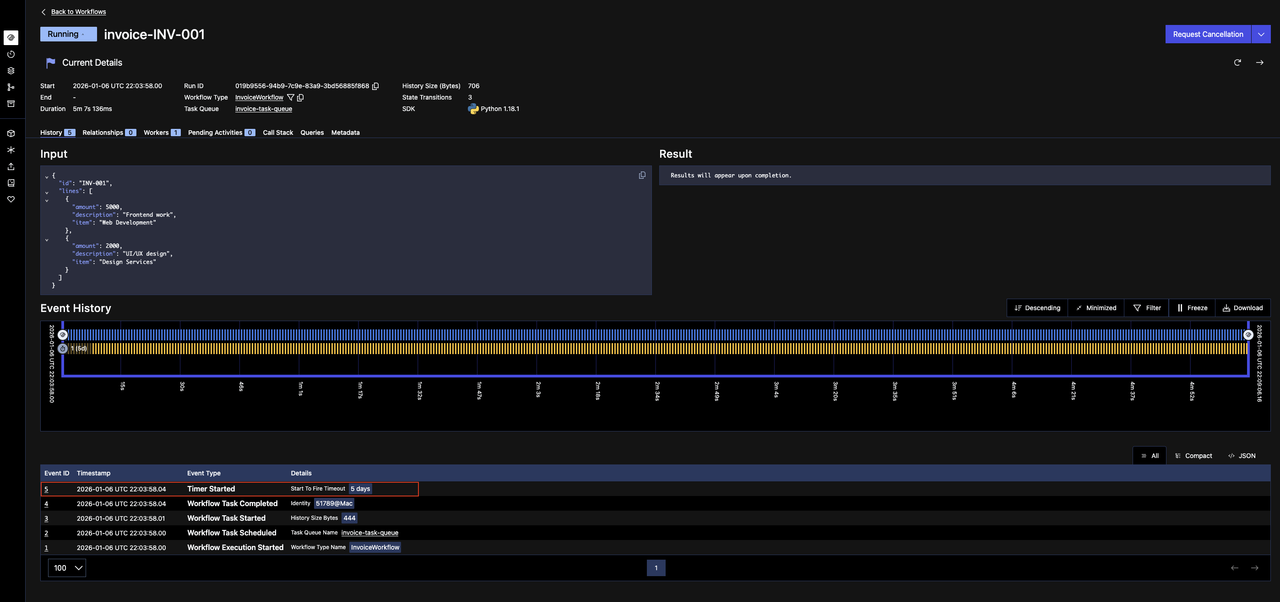
Access the Web UI at http://localhost:8233 when running the Temporal development server, and you should see that your Workflow Execution is currently running.
If you click on that Workflow Execution, you'll be able to see the details. Notice that there is currently a running timer for five days, waiting for approval for the invoice.
Step 3: Approve or Reject
To approve the invoice, ask Claude:
Approve invoice INV-001
Or to reject it:
Reject invoice INV-001
In this case, go ahead and approve the invoice and you'll see Claude will send the appropriate Signal, and the Workflow will immediately proceed based on the decision. In the Web UI, observe that the Workflow Execution has completed successfully:
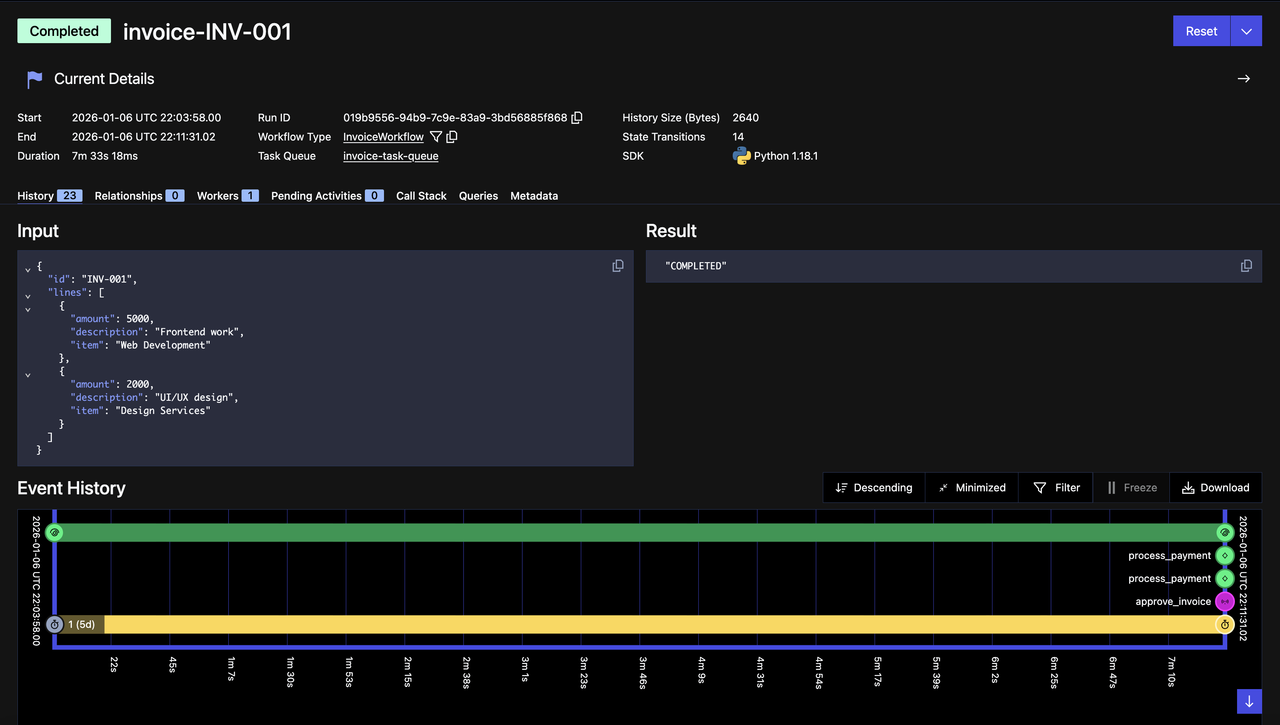
Step 4: Check the Status
We still need to test our get_invoice_status Query tool. Ask Claude:
What's the status of invoice INV-001?
Claude will use the get_invoice_status tool and should return something like: "Invoice INV-001 status is Completed. The invoice has been fully processed and approved, moving through the entire workflow successfully."
(Optional) Testing Durability: Quit Claude Desktop During Execution
Let's demonstrate Temporal's durability. We'll show that Workflows continue running even when the client disconnects.
Step 1: Process a New Invoice
- In Claude Desktop, ask something like:
Process this invoice:
{
  "id": "INV-002",
  "lines": [
    {"item": "Web Development", "amount": 3000.00, "description": "Frontend work"},
    {"item": "Design Services", "amount": 2000.00, "description": "UI/UX design"}
  ]
}
. - Click "Allow" when prompted to use the tool
- Claude will show that it's waiting for the tool response
Step 2: Quit Claude Desktop While the Workflow is Running
Immediately after allowing the tool use:
Completely quit Claude Desktop (don't just close the window)
- On macOS: Right-click the Claude icon in the dock and select "Quit"
- On Windows: Right-click the system tray icon and select "Exit"
The MCP server will disconnect, but check your terminals—the Worker and Temporal server are still running!
Step 3: Observe the Workflow Still Running

Notice the following:
- Status: The Workflow is still "Running"
- Event History: Shows the Workflow timer started
Even though Claude Desktop quit and the MCP server disconnected, the Workflow continues executing in Temporal. The Worker is still processing it. You'll then see the Workflow complete successfully—even though the original client (Claude Desktop) disconnected halfway through.
What This Demonstrates
This experiment proves several critical points:
- Workflows are durable - They don't depend on the client staying connected
- Workers are reliable - As long as the Worker is running, Workflows complete
- State is preserved - All progress is saved, nothing is lost when clients disconnect
In a production environment, this means:
- Your MCP tools can handle long-running operations (minutes, hours, or even days)
- Network interruptions don't cause data loss or incomplete work
- Clients can disconnect and reconnect without breaking workflows
- The system is truly fault-tolerant
Re-open your Claude Desktop and approve the invoice. You'll see that the Workflow Execution will complete successfully where it left off.
You're Done!
You've now completed this tutorial and seen the power of durable MCP tools with Temporal! Check out this repository that includes all the code used for it.
Sign up here to get notified about new tutorials and educational content.